Posts

Showing posts from December, 2017

forgery

Image
 Ronny and Matt from Church invited some youth to try simple forging.  Ronny brought an anvil and some know-how.  Matt brought a little propane forge. Starting from some simple rod stock, a couple guys each got to pound on the red hot metal: to make a stylish little letter-opener:  I got to hammer too, and made a wee "garlic cleaver": I didn't do much of the metal - i just supplied some dumb hammering while Ronny moved the work - but I was proud of the handle: I cut off 5" of an oak branch that had fallen during the recent storm, shaped it with a rasp, then burned it with a blowtorch to get the color.  I sealed it with a quick clear coat spray.  The handle only took about 90 minutes (mostly the rasp), and I was pleased with the comfort and color. I mounted it on the blade by drilling a hole in the wood (slightly undersized for the tang), heating up the metal to really hot, and shoving them together.  The hot metal burned its shape into the woo

stained glass triakis icosahedron

Image
It was hand-made from cut glass (score and snap), bound in copper foil (rather than lead came), and soldered with 60/40 (tin/lead) solder.The lighting is provided by strip of LED lights - it consumes little power, and could be supplied by a wall adapter or computer’s USB port.I find the shape to be both aesthetically and mathematically pleasing. On the Making First make a a lot of uniform isosceles triangles (at least 60, probably more if any turn out badly).  I made mine about 2.5 inches tall and 1.5 inches wide (a very poor-man's golden ratio). Bind all their edges in copper foil tape, solder the borders Solder them all together so internal dihedral angles are all exactly 138.189685° I made a little jig out of coat hangers and hot glue to help get the angles right. Before closing it up, shove an LED light strip in there. coat hanger jig calibrated to exactly 138.189685° On the Triakis Icosahedron The shape can be seen as a platonic icosahedron

Hearth finale... finally

Image
The top veneer of newer concrete never really hardened into a surface I could polish.  It remained weak and grainy, so I scraped it all back off: In removing the little PVC segment i'd used to cast a hole for the gas key, I chipped more of the surface.  Vexing! I gave it some sanding afterward, but because I'd given up on it looking "nice" I didn't go beyond 200 grit polishing (and I had pads going up to 3000!). I called friends to help me carry it (300+lbs) inside.  I had to cut a bunch of the wood to get it to fit right -- the standard approach of measure once, cut 5 times -- but it's in.  I didn't wind up gluing or shimming it at all -- it's pretty solid. This was a frustrating project, but the flaws aren't as offensive in person as I feared they would be.  They're less obtrusive than I'd feared, and all through christmas people were sitting on the hearth, so you couldn't see them anyway. The overall effect is fin

Hearth Update

Image
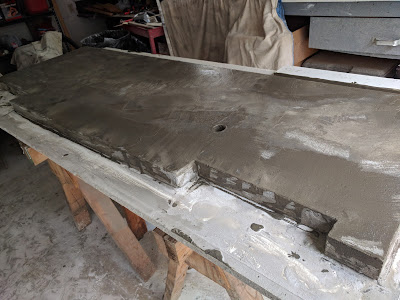
Follow-up to the recent follow-up: After casting the hearth and grinding out the flaws, and then leveling the depressions with cement slurry, I was unsatisfied with the resulting variation in color and texture: (I know i could make the polisher lines go away, but the major blotches weren't going to "buff out"). So my mother and I built a new form around the existing block: and poured (this time right-side-up) and troweled some new mortar (one batch for consistent color).  I tried really hard to get it reasonably smooth and pit-free, but tolerated some bumps (which i could later sand down).  It poured well, but unfortunately in my haste I tried to sand it again before it was sufficiently cured.  Worse, I did it in a highly visible area.  Because of the cold, two days was not enough (even with a space heater in the garage), to get it to sufficiently harden.  I mangled it pretty severely.  Very sad.  I think i'm done trying to make it perfect now -- we'

Robot Arm - sprockets and challenges

Image
Robot Arm Progress! Received and deployed the chain and sprockets: Now using a 3:1 reduction on the bottom of the arm (which bears the most strain), and use my 270 degree servo for that (giving me a 90 degree effective range, and converting my 20kg-cm to ~60kg/cm). using a 2:1 reduction on the middle of the arm. using 1:1 sprockets for the rotation. Chains and Sprockets!   Largest (48 tooth) gear at bottom of arm,  middle size (32 tooth) in the middle joint smaller (16T) on the servos (and on the underside to rotate the arm) Challenges I don't have a chain breaker, and that part was a lot harder than I imagined.  I pounded the pins out on my vise with a hammer and nailset, a nail, and a broken drill bit... just like the pros. I had trouble with a 3rd servo.  I traced through the various issues and determined it was particular to one of the "channels" I'd built to power the servos.  I tried a billion combinations of wires, and found that

little distractions

Image
A little light on project updates lately because: had a baby house lost power in a storm and i had to move out for a few days same storm threw large branches around the yard, crushing fences and breaking off my gutter and fascia. see: http://blog2.remingtons.org/2017/12/family-update.html for gutter and storm saga. So I have been: Dandling said baby Cooling heels and watching football at a friend's house for a while Replacing fascia, putting banged-up gutter back into place Chainsawing up fallen tree-matter. But even so I've made some progress - other updates to follow.

Follow-ups

Image
Concrete Hearth see:  http://projects.remingtons.org/2017/11/the-hearth-wants-what-it-wants.html After turning it out of its form, we (father-in-law and a friend and I) flipped the slab over.  The surface was nice and flat, but unfortunately had some surprisingly large air bubbles.  They weren't deep, so I tried grinding them out with a polisher borrowed from another friend.  I was able to reduce them, but it left little dimples which I didn't like.  So I did a skim coat of cement slurry (which is now curing, and can be seen below).  Hopefully i can take off the high spots of that without much trouble, because i was pretty generous. Duck Hut see:  http://projects.remingtons.org/2017/11/duck-hut.html The ducks stay up late partying most nights (til around 9pm -- the longer light keeps them laying even as the real days get shorter).  As you can see they're also ready for Christmas: Robot Arm see:  http://projects.remingtons.org/2017/11/mac-arduino-pi-perf